Posts

Showing posts with the label Charger

Thermal Controlled battery charger

Image
One way to charge batteries rapidly without abuse is to measure cell temperature and tapper the charge accordingly. The circuit uses a thermocouple for this function. A second thermocouple nulls out the effects of ambient temperature. The temperature difference between the two thermocouples determines the voltage , which appears at the amplifier's positive input. As battery temperature rises, this small negative voltage ( 1 degree Celcius between the thermocouples equals 40uV ) becomes larger. The amplifier, operating at a gain of 4300, gradually reduces the current through the battery to maintain its inputs at balance. The battery charges at a high rate until heating occurs and the circuit then tapers the charge. The values given in the circuit limit the battery-surface temperature rise over ambient to about 5 Degree Celcius. Part List : Resistor R1_____620K R2_____43K R3_____10R R4_____2K R5_____0.6R 5W Capacitor C1_____1uF C2_____0.1uF Diode D1_____1N4148 D2_____1N4001 Transisto...

Making a Solar Energy Powered an iPhone Battery Charger

Image
The project was termed as Mighty Minty Boost as it was developed to function as iPod/iPhone charger with solar power. Aside from being small, it has a large battery capacity of 3.7V at 2000mAh and it accepts input power from 3.7V to 7V. As shown in the images below, it can become a compact USB power supply when the solar cell is removed after charging. The Velcro is used to secure the Mighty Minty Boost inside a backpack or messenger bag after unplugging the solar cell. For faster charging, a larger solar cell can be attached to the bag. Enough power can be generated to fully charge an iPhone in about 5.5 hours and an iPod Touch in 4 hours using a slightly larger solar cell with 6V at 250mAh. The charger will automatically switch to trickle charging when the cell reaches full charge. The charging current is limited to 100mA when charging using the mini USB port and the charging is limited to 280mA when charging using the barrel plug jack . The materials needed to build the charger incl...

Automatic 9 volt Battery Charger Circuit Diagram

Image
Good care given to your NiCad batteries will ensure a long life. However, they do need to be handled and charged with special care. It is therefore important to first discharge the NiCad to 1 Volt per cell, ensure that the battery is discharged, and then start the charge cycle. recommend a charge current of 1/10th the capacity for a duration of about 15 hours uninterrupted. In reality, we learn some hard lessons when we forget to switch the charger off after the 15 hours and find that one or more cells inside the battery no longer accept a charge. That is the very reason that the circuit above is fully automated. The only thing to do is connect the battery and press the 'Start' button. When the discharge cycle is finished the circuit switches over to charge for 15 hours. After the 15 hours the circuits maintains a trickle charge to keep the battery 'topped-up Automatic 9-volt Battery Charger Circuit Diagram Before I go into the schematic details I like to explain some of th...

Alkaline Cell Charger Circuit Diagram

Image
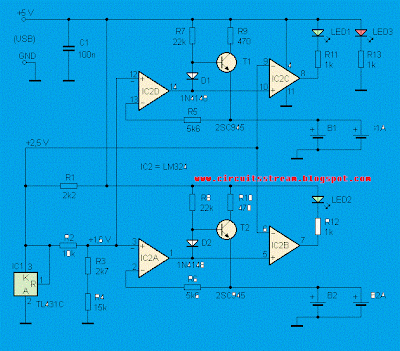
This is the Simple Alkaline Cell Charger Circuit Diagram . This charger works as two channel current limited voltage source 1.6 V. Low charge current allows charging deep discharged cells (0.7 - 0.8 V) and non-rechargeable cells. Charge current can be changed by R9 and R10. With 470 Ohm is approx 7 mA. LED1 and LED indicates when cell voltage reached 1.6 V and cell is fully charged.  If power supply is disconnected, reverse discharging current is negligibly (less than 1 microA). For this feature is operational amplifier type LM324 recommended or similar type with p-n-p transistor on input. Non-rechargeable cells can be charged, but their capacity will be significantly less than rechargeable cells Alkaline Cell Charger Circuit Diagram     Parts list R1 2,2 kohm R2 10 kohm R3 2,7 kohm R4 15 kohm R5, R6 5,6 kohm R7, R8 22 kohm (viz text) / depend on R9, R10 (approx. 50 times greater than R9, R10) R9, R10 470 ohm (see text) / change charge current R11,...

Solar Charger Circuit Diagram

Image
Simple Solar charger circuit to take advantage of sunlight shining on the earth can continue to be utilized to serve as a power source so that we can at least save on electricity prices continuing to rise, below is one of a series of simple power plant can be created and used to fill your motorcycle battery or for emergency lights . The circuit scheme of Solar Power Generation Sunlight is received by the solar panels are then processed into electricity, but electricity generated from each panel is still too small where the 8 Cell Panel arranged in series only mrnghasilkan voltage of approximately 4 volts with a current 200 mA. nah therefore required an electronic circuit to increase the voltage and current enough to be used as a Battery Charger . Electronic Rainmaking act as a series of DC to DC Inverter (DC to DC Inverter), which was built by two pieces of Capacitor, Resistor 1, a transistor , a diode, and a coil which is the point of the creation of this series. The circuit ...

Automatic 6 volt 12 volt 24 volt Lead Acid Battery Charger

Image
A simple yet accurate automatic, regulated 6/12/24 volt lead acid battery charger circuit is explained in this article. The circuit switches off the current to the battery as soon as the battery reaches full charge. An illuminated LED at the output indiacates the fully charged condition of the battery. The circuit diagram may be understood from the following points: Fundamentally the voltage control and regulation is done by the versatile, work horse IC LM 338. An input DC supply volt in the range of 30 is applied to the input of the IC. The voltage may be derived from a transformer, bridge and capacitor network. The value of the 47k  preset is set to get the required output voltage, depending upon the battery voltage to be charged. If a 6 volt battery needs to charged, R2 is selected to produce a voltage of around 7 volts at the output, for a 12 volt battery it becomes 14 volts and for a 24 volt battery, the setting is done at around 28 volts. The above settings take ...

Simple Lead Acid Battery Charger 2

Image
The above pictured schematic diagram is just a standard constant current model with a added current limiter, consisting of Q1, R1, and R4. The moment too much current is flowing biases Q1 and drops the output voltage. The output voltage is: 1.2 x (P1+R2+R3)/R3 volt. Current limiting kicks in when the current is about 0.6/R1 amp. For a 6-volt battery which requires fast-charging, the charge voltage is 3 x 2.45 = 7.35 V. (3 cells at 2.45v per cell). So the total value for R2 + P1 is then about 585 ohm. For a 12 V battery the value for R2 + P1 is then about 1290 ohm.  For this power supply to work efficiently, the input voltage has to be a minimum of 3V higher than the output voltage. P1 is a standard trimmer potentiometer of sufficient watt for your application. The LM317 must be cooled on a sufficient (large) coolrib. Q1 (BC140) can be replaced with a NTE128 or the older ECG128 (same company). Except as a charger , this circuit can also be used as a regular power supply . Parts ...

Charger circuit equipped with a regulator circuit output voltage

Image
The circuit charger is equipped with voltage output settings , so that we can regulate how much voltage to charge the battery. And the settings using the potentio making it easier for us managing voltage up to a mV. See charger circuit below : Adjust the circuit by setting the 500 Ohm resistor while it is attached to a fully charged battery. You can use the circuit to charge : Cells battery Wet Accu Dry Accu Nicad battery Solar battery

Battery Charger Used in Grid and Substation

Image
In almost on all the 132 kV & 220 kV Sub-stations two sets of 110 V (for protection) and one set of 48 V (for carrier communication) lead Acid station batteries along with battery chargers are installed. The battery charging equipment comprises of a float charger and a boost charger. Stabilization  output voltage is provided in the float charger to float the battery at the correct level. The battery can be boost charging after a prolonged mains failure by the boost charger. These chargers have been provided protection for under voltage DC & earth fault. DC Board is installed to feed various essential DC load from a separate feeder. Recommended specific gravity of cells at 27 0 C (electrolyte temp) should be 1.210 ± 0.005. Actual temp should be measured in the electrolyte of the cell. If the temp is different than 27 0 C the correction ± 0.0007/ 0 C change in temp. should be made in sp. gr. (Subtract for temp. below 27 0   C  and add f...

Mobile Phone Travel Charger Circuit Diagram

Image
This is a Mobile Phone Travel Charger Circuit Diagram. At this point is an ideal cellular phone charger using 1.5 Volt ballpoint cells to charge mobile phone while wandering. It can refill cell phone battery three before four period in the field of spaces everyplace AC power is not on hand. A good number of the cell phone phone batteries are rated by the side of 3.6 in opposition to/500 mA. A single create torch cell can provide 1.5 volts and 1.5 Amps current. So if four pen cells are connected serially, it wish form a battery bunch with 6 volt and 1.5 Amps current. while power is practical to the circuit through S1, transistor T1 conducts and grassy LED light. Mobile Phone Travel Charger Circuit Diagram What time T1 conducts T2 furthermore conducts since its dishonorable becomes denial. Charging current flows from the satellite dish of T1. To reduce the charging voltage to 4.7 volts, Zener diode ZD is used. The output gives 20 mA current on behalf of stupid charging. If additio...

Battery Charger LM317

Image
Lead Acid Battery Charger circuit is highly recommended to recharge battery. And recommended that maximum voltage 24V 7A battery, so you can recharge a battery simultaneously. Battery Charger has been little use of several components such as diodes, electrolytic capacitors , transistors , resistors, and also for strengthening of the voltage and current stresses. And also do not forget to lowering electric voltage 220V to 20V-35V 5-10 Ampere suitable for Lead Acid Battery Charger circuit.  List of components for the circuit Lead Acid battery : R1               = 1 Ω 2w R2               = 100 Ω R3               = 220 Ω R4               = 10K Ω Trim D1 - D5       = IN4004 Q1               = BC547 IC 1          ...

Motorcycle Battery Charger

Image
Ordinary car battery chargers are simple and inexpensive devices that continuously charge the battery with a pace few amps, for the time the device is ON. If the holder does not close in time the charger, the battery will overcharge and electrowinning capacity will be lost by evaporation or likely to be destroyed elements. The charger circuit overcomes these defects. Electronically controls the battery charge and has a feedback control circuit, causing the battery to charge a maximum rate until fully charged. When fully charged, lights up a red Led (LD2). The charger is designed to charge batteries of 12V, only. What should be paid by whom built the circuit, are the cables connecting the transformer to the circuit and then the battery should be high profile, so that heat when it passes through the current load and also not cause voltage drop in the path of current through them. Motorcycle Battery Charger Circuit Diagram When construction is finished turn the TR1 in place zero valu...

Car Battery 12v Charger Circuit Diagram

Image
The usual chargers of battery automotive, are simple and cheap appliances that charge continuously the battery, with a rythm of few amperes, for the time where the appliance is ON. If the holder do not close in time the charger, the battery will overcharge and her electrolytic faculty are lost with evaporation or likely exists destruction of her elements. The charger of circuit exceeds these faults. It checks electronic the situation of charge of battery and it has circuit of control with retroaction, that forces the battery charge with biggest rythm until charge completely. When charge completely, it turns on one RED led (LD2). The charger has been drawn in order to charge batteries of 12V, ONLY. What should watch it from what it manufactures the circuit, they are the cables that connect the transformer with the circuit and in the continuity the battery, should they are big cross-section, so that heat when it passes from in them the current of charge and also they do not cause fall of...

Battery Charger Using LTC4078

Image
Using the LTC4078 standalone linear charger circuit you can design a very simple single-cell battery charger circuit for Li-Ion Li-Polymer battery . This LTC4078 battery charger circuit works from both wall adapter and USB inputs. This charger can detect power at the inputs and automatically select the appropriate power source for charging. Battery Charger Using LTC4078 Circuit diagram As you can see in the circuit diagram , this Li-Ion Li-Polymer charger requires few external components and you will need to apply just few equations ,to design a full work USB , wall adapter charger . The charge current can be programmed up to 950mA from wall adapter input . IUSB pin is used for program the charge current for USB power that can be programmed by connecting a resistor to the ground. The voltage on this pin can be used to measure the battery current delivered from the USB input using the following formula: IBAT = (VIUSB/RIUSB)*1000 . ITERM pin is the termination current threshold program t...

USB Powered Mobile Phone Battery Charger

Image
Now you can charge your Mobile Phone from the USB outlet of PC This simple circuit can give regulated 4.7 volts for charging a mobile phone. USB outlet can give 5 volts DC at 100mA current which is sufficient for the slow charging of mobile phones. Most of the Mobile Phone batteries are rated 3.6 volts at 1000 to 1300 mAh. These battery packs have 3 NiMh or Lithium cells having 1.2 volt rating. Usually the battery pack requires 4.5 volts at 300-500 mA current for fast charging. But low current charging is better to increase the efficiency of the battery. The circuit described here provides 4.7 regulated voltage and sufficient current for the slow charging of the mobile phone. Transistor Q1 is used to give the regulated output. Any medium power NPN transistor like CL100, BD139, TIP122 can be used. Zener diode D2 controls the output voltage and D1 protects the polarity of the output supply. Front end of the circuit should be connected to a A type USB plug. Connect a red wire to pin1 and ...

USB Charger For Lithium Ion battery

Image
USB Battery Charger For Lithium Ion battery with the LM3622 is a series of lithium ion battery charger. This charger circuit operates using power from the USB source PC. Current consumption of a series of USB Battery Charger For Lithium Ion battery with 400mA LM3622 is limited by R1, so it does not exceed the current maximum limit that can be given by a USB computer. Brains from USB Battery Charger For Lithium Ion battery with IC LM3622 , it is a national of having special technical specification charger for lithium ion batteries. In a series of USB Battery Charger For Lithium Ion with LM3622 R1 0.25 Ohm value that serves to limit the charging current 400mA to the battery. Q2 and Q1 is the last part of the USB Battery Charger For Lithium Ion battery with the LM3622. In principle, USB Battery Charger For Lithium Ion with LM3622 identify the condition of the battery full charged battery voltage via pin 6 LM3622. USB Series Lithium Ion Battery Charger For LM3622 is equipped with a switch ...

Simple Mobile Phone Battery Charger

Image
Mobile phone chargers available in the market are quite expensive. The circuit presented here comes as a low-cost alternative to charge mobile telephones/battery packs with a rating of 7.2 volts, such as Nokia 6110/6150.   Circuit diagram: Mobile Phone Battery Charger Circuit Diagram   Parts R1 = 1K R2 = 47R R3 = 10R R4 = 47R C1 = 1000uF-25V D1 = LEDs any color D2 = LEDs any color D3 = LEDs any color D4 = 1N4007 D5 = 1N4007 IC1 = LM7806 T1 = 9VAC Xformer 250mA BR1 = Diode bridge 1A Circuit Operation: The 220-240V AC mains supply is down-converted to 9V AC by transformer T1. The transformer output is rectified by BR1 and the positive DC supply is directly connected to the charger’s output contact, while the negative terminal is connected through current limiting resistor R2. D2 works as a power indicator with R1 serving as the current limiter and D3 indicates the charging status. During the charging period, about 3 volts drop occurs across R2, which turns on D3 through R3. An e...

USB Charger Using IC MAX1555

Image
This USB charger circuit is designed using the MAX1555 IC circuit manufactured by Maxim Semiconductor This MAX1555 USB charger can be used using the USB power or AC power.This MAX1555 charger is charging at 100mA from USB port and the maximum charging current increases to 350mA if the USB the AC adapter is connected . If both power types are connected in the same time the AC adapter is automatically given precedence.  USB Charger Circuit diagram This charger can be used for small devices like : PDAs ,Cell Phones , Digital Cameras , MP3 Players and other.The charger can be used for Li-Ion or Li-Polymer batteries . The electronic project charger circuit require a input voltage between 3V and 7 V and deliver an 3.3 V output voltage.As you can see in the circuit diagram , before the IC is connected the MAX8881 linear regulator IC which is capable to deliver up to 200mA.The MAX1881 is specially designed for battery-powered applications where reverse battery protection and long battery ...

Battery Charger using LM317 Regulator

Image
Battery Charger using LM317 Regulator This Battery Charger is very similar to the universal charger that uses the constant current load. But this is much simpler to build and can be built using only two parties, the LM317 regulator and resistance. The use of diode D is for protection against short circuits. Capacitors C1 and C2 is good voltage regulation. Resistance R2 operates a dummy load when the battery is disconnected. The idea of ​​this magazine is the output current is equal to 1.2 V, divided by the value of R1. Part List: LM317 R1 - see the values in table below R2 - 2.2 kilo-ohms 1/4W C1,C2 - 47uF/25V, or any value will do, the higher the better D - 1N4001 or any similar diode at-least 1A rated

Switchless NiCd NiMH Battery Charger Circuit Diagram

Image
Description This circuit may be used to replace the single current limiting resistor often found in dirt cheap battery chargers. The alternative shown here will eventually pay off because you no longer have to throw away your NiCds after three months or so of maltreatment in the original charger. The circuit diagram shows an LM317 in constant-current configuration but without the usual fixed or variable resistor at the ADJ pin to determine the amount of output current. Also, there is no switch with an array of different resistors to select the charge currents for three cell or battery types we wish to charge: AAA, AA and PP3 (6F22). When, for example, an empty AAA cell is connected, the voltage developed across R1 causes T1 to be biased via voltage dropper D1.  Circuit Diagram   This results in about 50 µA flowing from the LM317’s ADJ pin into the cell, activating the circuit into constant-current mode. D4 is included to prevent the battery being discharged when the charger is...