Posts

Showing posts with the label circuit

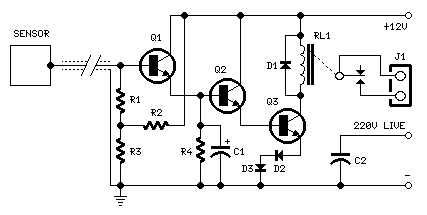
Capacitive Sensor Circuit Schematic Diagram
Image
Special design for shop-windows animation Useful for many types of touch controls Circuit diagram: Parts: R1,R2_____1M 1/4W Resistors R3,R4____47K 1/4W Resistors C1_______10µF 25V Electrolytic Capacitor C2______470pF 630V Ceramic or Polyester Capacitor D1-D3____1N4002 100V 1A Diodes Q1-Q3_____BC337 45V 800mA NPN Transistors RL1_______Relay with SPDT 2A @ 220V switch Coil Voltage 12V. Coil resistance 200-300 Ohm J1________Two ways output socket Sensor____Aluminium or copper thin sheet with the dimensions of a post-card, glued at the rear of the same (about 15x10.5 cm.) Thin screened cable Circuit Description:  The purpose of this circuit is to animate shop-windows by means of a capacitive sensor placed behind a post-card-like banner. The card is placed against the glass inside the shop-window, and the visitor can activate the relay placing his hand on the card, from the outside. Especially suited for toy-shops, the circuit can activate model trains, small electric racing cars, lig...
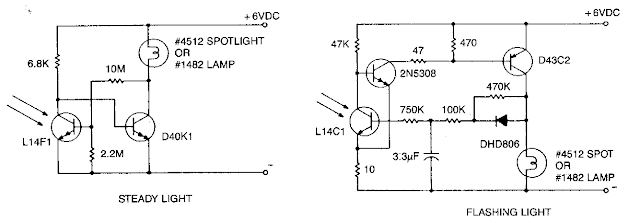
Warning Light and Marker Light Circuit Diagram

Image
This is a Warning Light and Marker Light Circuit Diagram. A flashing light of high brightness and short duty cycle is often desired to provide maximum visibility and battery life. This necessitates using an output transistor, which can supply the cold filament surge current of the lamp while maintaining a low saturation voltage. The oscillation period and flash duration are determined in the feedback loop, while the use of a photo transistor sensor minimizes sensitivity variations.  Warning Light and Marker Light Circuit Diagram  

b Diode Circuit

Image
Diode Circuit A) Freewheeling Diode Circuit Basic circuit diagram: freewheeling diode Fig. Switching over voltage of a contactor with diode Advantage : Switching over voltage limited to 0.7 volt Disadvantage: Breaking delay, breaking time increased by a factor 6 to 9. Note: Above disadvantage can be used to your advantage if, for example, a temporary voltage drop of around several milliseconds has to be bridged B) Circuit with One Diode / Zener Diode Diode Assembly Fig. Basic circuit diagram: diode assembly Fig. : Switching over voltage of a contactor zener & diode Advantage: Switching over voltage limited to 10 volt Disadvantage: Breaking delay, breaking time increased by a factor 2 to 6 Note: Above disadvantage can be used to your advantage if, for example, a temporary voltage drop of around several milliseconds has to be bridged ........

Detector Wireless Electricity Circuit Diagram

Image
This is a Simple Detector Wireless Electricity Circuit Diagram . This is more of those circuits quite simple, but very useful, especially in the electrical area. This detector is an electric probe, which can also be used to detect the presence of high voltage on the wires and also as a touch switch, then the LED may be replaced with a relay to connect and disconnect a device (but only when something is detected).  The circuit is very simple and consists of only three transistors, 3 resistors, 1 LED and a 9V battery. He has a high gain by being in Darlington transistors, and the probe (copper strip) is a small piece of copper or a wire.  Detector Wireless Electricity Circuit Diagram

Speed and direction converter circuit

Image

LED Circuit Project Using with 555 IC

Image
This is a very simple Electronic Circuit Project for LED Circuit Project Using with 555 IC. This circuit LED reproduces the first LED sequence at this time used by FISA on behalf of Formula single racing. It may perhaps be alive used with slot car sets (such for example HO shin up AFX/Life Like/Tyco sets) or else means of communication controlled cars. IC1, a 555 timer IC, is used as a watch pulse generator. Its output is fed via NAND gates IC2a and IC2c to IC3, a 4024 binary counter. IC2b inverts the O4 output of 4024 binary counter IC3. originally, IC3 is reset and all its outputs are low, together with O4, which causes IC2b to present-day a rational climax to the pin 8 input of IC2c which after that passes pulses from the 555 timer circuit to the clock input of the 4024. IC3 then begins together with. LED Circuit Project Using with 555 IC: Following the count has reached binary 1111, the subsequently pulse sends the O4 output of IC3 high, which disables IC2c and IC3 stops with. The...

Automatic Low Power Emergancy Light Circuit diagram

Image
Here is a white-LED-based emergency light that offers the following advantages. 1-It is highly bright due to the use of white LEDs. 2-The light turns on automatically when mains supply fails, and turns off when mains power resumes. 3-It has its own battery charger. When the battery is fully charged, charging stops automatically. The charger power supply section is built around 3-terminal adjustable regulator IC LM317 (IC1), while the LED driver section is built around transistor BD140 (Q2). In the charger power supply section, an input AC main is stepped down by T1 to deliver 9V, 500mA to the bridge rectifier, which comprises diodes D1 through D4. Filter capacitor C1 eliminates ripples. Unregulated DC voltage is fed to input pin 3 of IC1 and provides charging current through D5 and limiting resistor R15. By adjusting preset P1, the output voltage can be adjusted to deliver the required charging current. When the battery gets charged to 6.8V, D6 conducts and charging current from IC1 fi...

Polarity indicator circuit

Image
Is is easy to test the polarity of a circuit’s point whether it is positive or negative by using the tester circuit featured here. The tester circuit has a high input impedance (around 1 megaohms) to avoid loading the point being tested. In testing sensitive points however, (inputs of opamps), the input impedance must be taken into consideration. The opamp 741 is the core of the polarity indicator circuit. Its non-inverting input is used to test the points for polarity. It has a gain of around 150 which enables it to test low voltage levels. The test result is displayed through the two LED’s D1 and D2. D1 lights up by positive polarity and D2 lights up by negative polarity. Take note that the pin profile on the diagram is based on the TO-5 package profile.

Warning Light and Marker Light Circuit Diagram

Image
This is a Warning Light and Marker Light Circuit Diagram. A flashing light of high brightness and short duty cycle is often desired to provide maximum visibility and battery life. This necessitates using an output transistor, which can supply the cold filament surge current of the lamp while maintaining a low saturation voltage. The oscillation period and flash duration are determined in the feedback loop, while the use of a photo transistor sensor minimizes sensitivity variations.  Warning Light and Marker Light Circuit Diagram  

Simple Power Pulse Using by LM350 and NE555 Circuit Diagram

Image
This Power Pulse Using by LM350 and NE555 Circuit Diagram can use to drive lamp,power LED,DC motor etc. Adjust R5 for output amplitude.Adjust R1 for output power .The LM350 is adjustable 3-terminal positive voltage regulators is capable of supplying in excess of 3A over a 1.2V to 33V output range.This circuit requires 5-15V power supply. Power Pulse Using by LM350 and NE555 Circuit Diagram  

Flashing Indicator 555 timer circuit

Image
  Flash "turn indicators" using a 555 and a single 20 amp relay. Here is our suggestion. The timing resistor needs to be selected for the appropriate flash-rate. 

60 watt power amplifier circuit with TDA1512

Image
This  is low noise power amplifier , high output power amplifier for full range speakers, but you can use the woofer speakers to this circuit .  Maximum output power 60 Watt with impedance 4 Ohms see circuit below :   Description for circuit above : Minimum Supply Voltage   : 12-Volt DC Maximum Supply Voltage  : 25-Volt DC Maximum Power Output : 60 Watts Impedance Speaker : 4 Ohm Current Voltage : 3A

Fan Speed ​​Control for Temperature Circuit Diagram

Image
With this simple circuit that you will be able to control the speed of a DC fan according to the temperature measured by a temperature sensor. It is an ideal accessory for your projects that require cooling that are not constant.  This simple design allows precise speed control of motors, fans, and blowers, proportional to the temperature. An NTC thermistor (R1) is used as temperature sensor. A circuit optional was added to remotely monitor the operation of the fan and to allow some kind of indication of the approximate speed by increasing the brightness of an LED.  Fan Speed ​​Control for Temperature Circuit Diagram The R5 must be configured to allow the engine just starting to run at the desired temperature. Any 6K8 between the NTC thermistor 22K can operate provided that the R2 value is one tenth of the thermistor. R6, R7 and D1 are optional: R7 obligation is adjusted until the LED glow dimly when the engine is just running. Parts List R1 15K @ 20 ° C NTC Thermistor (See No...

Holiday Lighting Sequencer Circuit Diagram

Image
Flasher bulbs use a bi-metallic strip which interrupts the series circuit when the lamp becomes hot.. This is a Best Holiday Lighting Sequencer Circuit Diagram . This is Integrated circuit Ul (a 555 oscillator/timer) is wired as a conventional pulse generator. The frequency of the pulse generator is controlled by potentiometer Rll. Resistor R2 puts a reasonable limit on the highest speed attainable. The output of the pulse generator is fed to the common clock input of U2, a 74C175 quad D-type flip-flop.   Best Holiday Lighting Sequencer Circuit Diagram   Each flip-flop is configured so that its Q output is coupled to the D input of the subsequent flip-flop. Information on the D input of each flip-flop is transferred to the Q (and Q) outputs on the leading edge of each clock pulse. Switch S2 allows you to invert the information on the D input of the first flip-flop at any time during the cycle. This allows you to create a number of different sequences, which are determined...

5 1 surround amplifier circuit schematic

Image
This 5.1 surround amplifier circuit schematic use the IC AN7168 as the main component from this circuit . Minimum voltage required 12V and maximum voltage 24V , I recomended it 12 V because the voltage support on are components. But if you want to better a loud sound you can raise it.  Maximum power output 40W with impedance 4 ohm . This 5.1 surround amplifier circuit schematic also support to make surround sound or 5.1 speaker. Use this amplifier on rear speaker , left right , and center but dont use to subwoofer speaker. See 5.1 surround amplifier circuit schematic below : Click to view large If you want to make a 5.1 surround sound you must make 5 the circuit of 5.1 surround amplifier circuit schematic , for left and right speaker , rear left and right speaker , and center speaker. Use the subwoofer speaker with support amlplifier subwoofer circuit .

Tactful Triac Controller Circuit Diagram

Image
Simple Tactful Triac Controller Circuit Diagram . This is the sensitive triac circuit in this circuit the single transistor connected between the capacitor and the common side of the ac line allows a logic-level signal to control this triac power circuit. Resistor R2 prevents false triggering of the triac by the trickle current through the diac. Simple Tactful Triac Controller Circuit Diagram Sourced By: Circuitsstream

LM1875 – POWER AMPLIFIER 20 WATT CIRCUIT dIAGRAM

Image
The LM1875 is a monolithic power amplifier offering very low distortion and high quality performance for consumer audio applications. The LM1875 delivers 20 watts into a 4Ω or 8Ω load on ±25V supplies. Using an 8 load and ±30V supplies, over 30 watts of power may be delivered. The amplifier is designed to operate with a minimum of external components. Device overload protection consists of both internal current limit and thermal shutdown. The LM1875 design takes advantage of advanced circuit techniques and processing to achieve extremely low distortion levels even at high output power levels. Other outstanding features include high gain, fast slew rate and a wide power bandwidth, large output voltage swing, high current capability, and a very wide supply range. The amplifier is internally compensated and stable for gains of 10 or greater. Features • Up to 30 watts output power • AVO typically 90 dB • Low distortion: 0.015%, 1 kHz, 20 W • Wide power bandwidth: 70 kHz • Protection for A...

Smoke Extractor Circuit Diagram

Image
Here is a low-cost circuit that automatically extracts solder fumes while you assemble a circuit, thereby saving you from inhaling the same. The solder paste gives off toxic fumes, which could pose a potential health hazard if not controlled. Those working closely with electronic components are at a higher risk of fumes being inhaled. Place this compact unit close to the circuit board and it will extract all the fumes from the immediate working area, leaving smoke-free surroundings. It is fully automatic and turns on a fan when the soldering iron is kept in the holder unit after making a solder joint. The fan automatically turns off after a few seconds. The automatic working of the unit is convenient as the soldering work is intermittent. Fig. 1: Circuit of smoke extractor The circuit (Fig. 1) is designed around popular op-amp µA741 (IC1), which is configured as a comparator. Its non-inverting input (pin 3) is held high by a potential divider comprising resistor R1 and an NTC thermisto...

Circuit diagram of solar diagram

Image

Signal Injector Circuit Diagram

Image
This is the simple Signal Injector Circuit Diagram. This circuit is wealthy in harmonics and is good for testing amplifier circuits. to seek out a fault in an amplifier,  Connect the planet clip to the 0v rail and move through each stage, beginning at the speaker. a rise in volume ought to be heard at every preceding stage. This Injector will bear the IF stages of radios and FM sound sections in TV's. to Index Signal Injector Circuit Diagram