Posts

Showing posts with the label DIAGRAM

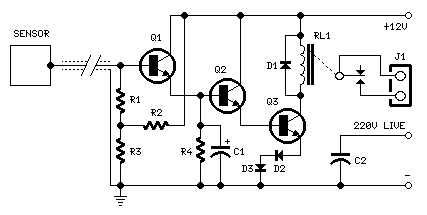
Capacitive Sensor Circuit Schematic Diagram
Image
Special design for shop-windows animation Useful for many types of touch controls Circuit diagram: Parts: R1,R2_____1M 1/4W Resistors R3,R4____47K 1/4W Resistors C1_______10µF 25V Electrolytic Capacitor C2______470pF 630V Ceramic or Polyester Capacitor D1-D3____1N4002 100V 1A Diodes Q1-Q3_____BC337 45V 800mA NPN Transistors RL1_______Relay with SPDT 2A @ 220V switch Coil Voltage 12V. Coil resistance 200-300 Ohm J1________Two ways output socket Sensor____Aluminium or copper thin sheet with the dimensions of a post-card, glued at the rear of the same (about 15x10.5 cm.) Thin screened cable Circuit Description:  The purpose of this circuit is to animate shop-windows by means of a capacitive sensor placed behind a post-card-like banner. The card is placed against the glass inside the shop-window, and the visitor can activate the relay placing his hand on the card, from the outside. Especially suited for toy-shops, the circuit can activate model trains, small electric racing cars, lig...

Detector Wireless Electricity Circuit Diagram

Image
This is a Simple Detector Wireless Electricity Circuit Diagram . This is more of those circuits quite simple, but very useful, especially in the electrical area. This detector is an electric probe, which can also be used to detect the presence of high voltage on the wires and also as a touch switch, then the LED may be replaced with a relay to connect and disconnect a device (but only when something is detected).  The circuit is very simple and consists of only three transistors, 3 resistors, 1 LED and a 9V battery. He has a high gain by being in Darlington transistors, and the probe (copper strip) is a small piece of copper or a wire.  Detector Wireless Electricity Circuit Diagram

Automatic Low Power Emergancy Light Circuit diagram

Image
Here is a white-LED-based emergency light that offers the following advantages. 1-It is highly bright due to the use of white LEDs. 2-The light turns on automatically when mains supply fails, and turns off when mains power resumes. 3-It has its own battery charger. When the battery is fully charged, charging stops automatically. The charger power supply section is built around 3-terminal adjustable regulator IC LM317 (IC1), while the LED driver section is built around transistor BD140 (Q2). In the charger power supply section, an input AC main is stepped down by T1 to deliver 9V, 500mA to the bridge rectifier, which comprises diodes D1 through D4. Filter capacitor C1 eliminates ripples. Unregulated DC voltage is fed to input pin 3 of IC1 and provides charging current through D5 and limiting resistor R15. By adjusting preset P1, the output voltage can be adjusted to deliver the required charging current. When the battery gets charged to 6.8V, D6 conducts and charging current from IC1 fi...

Warning Light and Marker Light Circuit Diagram

Image
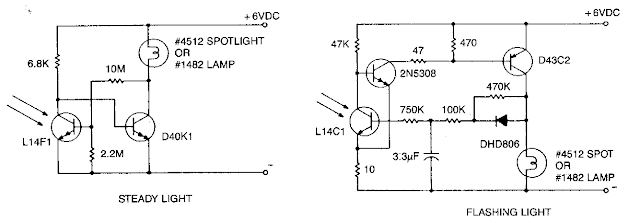
This is a Warning Light and Marker Light Circuit Diagram. A flashing light of high brightness and short duty cycle is often desired to provide maximum visibility and battery life. This necessitates using an output transistor, which can supply the cold filament surge current of the lamp while maintaining a low saturation voltage. The oscillation period and flash duration are determined in the feedback loop, while the use of a photo transistor sensor minimizes sensitivity variations.  Warning Light and Marker Light Circuit Diagram  

Simple Power Pulse Using by LM350 and NE555 Circuit Diagram

Image
This Power Pulse Using by LM350 and NE555 Circuit Diagram can use to drive lamp,power LED,DC motor etc. Adjust R5 for output amplitude.Adjust R1 for output power .The LM350 is adjustable 3-terminal positive voltage regulators is capable of supplying in excess of 3A over a 1.2V to 33V output range.This circuit requires 5-15V power supply. Power Pulse Using by LM350 and NE555 Circuit Diagram  

PHOTOSYNTHESIS DIAGRAM

Image
... Diagram Photosynthesis ... ... Photosynthesis light ... ... photosynthesis diagram I am curious about / confused ... Expand on the diagram, ... photosynthesis. Diagram of the ... An error occurred. Photosynthesis-Infographic- ... image ... Diagram Showing Photosynthesis

Fan Speed ​​Control for Temperature Circuit Diagram

Image
With this simple circuit that you will be able to control the speed of a DC fan according to the temperature measured by a temperature sensor. It is an ideal accessory for your projects that require cooling that are not constant.  This simple design allows precise speed control of motors, fans, and blowers, proportional to the temperature. An NTC thermistor (R1) is used as temperature sensor. A circuit optional was added to remotely monitor the operation of the fan and to allow some kind of indication of the approximate speed by increasing the brightness of an LED.  Fan Speed ​​Control for Temperature Circuit Diagram The R5 must be configured to allow the engine just starting to run at the desired temperature. Any 6K8 between the NTC thermistor 22K can operate provided that the R2 value is one tenth of the thermistor. R6, R7 and D1 are optional: R7 obligation is adjusted until the LED glow dimly when the engine is just running. Parts List R1 15K @ 20 ° C NTC Thermistor (See No...

Bicycle Alarm Schematics Diagram

Image
The author wanted a very cheap and simple alarm for some of his possessions, such as his electrically assisted bicycle. This alarm is based on a cheap window alarm, which has a time-switch added to it with a 1-minute time-out. The output  pulse of the 555 replaces the reed switch in the window alarm. The 555 is triggered by a sensor mounted near the front  wheel, in combination with a magnet that is mounted on the spokes. This sensor and the magnet were taken from a cheap bicycle computer. The front wheel of the bicycle is kept unlocked, so that the reed  switch closes momentarily when the wheel turns. This  triggers the 555, which in turn activates the window alarm. The circuit around the 555 takes very little current and can  be powered by the batteries in the window alarm.  There  is just enough room  left inside the enclosure of the window  alarm to mount the time-switch inside it. Bicycle Alarm Schematics Diagram The result is a very che...

Smoke Extractor Circuit Diagram

Image
Here is a low-cost circuit that automatically extracts solder fumes while you assemble a circuit, thereby saving you from inhaling the same. The solder paste gives off toxic fumes, which could pose a potential health hazard if not controlled. Those working closely with electronic components are at a higher risk of fumes being inhaled. Place this compact unit close to the circuit board and it will extract all the fumes from the immediate working area, leaving smoke-free surroundings. It is fully automatic and turns on a fan when the soldering iron is kept in the holder unit after making a solder joint. The fan automatically turns off after a few seconds. The automatic working of the unit is convenient as the soldering work is intermittent. Fig. 1: Circuit of smoke extractor The circuit (Fig. 1) is designed around popular op-amp µA741 (IC1), which is configured as a comparator. Its non-inverting input (pin 3) is held high by a potential divider comprising resistor R1 and an NTC thermisto...

Signal Injector Circuit Diagram

Image
This is the simple Signal Injector Circuit Diagram. This circuit is wealthy in harmonics and is good for testing amplifier circuits. to seek out a fault in an amplifier,  Connect the planet clip to the 0v rail and move through each stage, beginning at the speaker. a rise in volume ought to be heard at every preceding stage. This Injector will bear the IF stages of radios and FM sound sections in TV's. to Index Signal Injector Circuit Diagram  

Key parts of a sequence diagram

participant: an object or entity that acts in the sequence diagram sequence diagram starts with an unattached "found message" arrow message: communication between participant objects the axes in a sequence diagram: Horizontal: which object / participant is acting Vertical: time (down -> forward in time)

Philips 55PFL5706 F7 – Circuit diagram Full

Image
HOW TO INITIALIZE THE LCD TV The purpose of initialization is to place the set in a new out of box condition. The customer will be prompted to select a language and program channels after the set has been initialized. To put the program back at the factory-default, initialize the LCD TV using the following procedure. 1. Turn the power on. 2. Enter the service mode. - To cancel the service mode, press [ power ] button on the remote control unit. 3. Press red button on the remote control unit to initialize the LCD television. 4. After confirming that “INITIALIZED FINISH” appears on the screen, unplug the AC Cord. How to set up the service mode Service mode: 1. Turn the power on. 2. Press [0], [6], [2], [5], [9], [6] and [INFO] buttons on the remote control unit in this order. The service mode screen appears. To cancel or to exit  press [PREV. CH] button. SMPS SCHEMATIC Fixed voltage (or Auto voltage selectable) power supply circuit is used in this unit.  If Main Fuse (F1601) is ...

500W Audio Power Amplifier Circuit Diagram with Transistor

Image
We take transistor MJL2194 and MJL2193 for drive output signal.so the amp has a capacity for enormous instantaneous current ability.  500W Audio Power Amplifier Circuit Diagram I think, it is useful for you to apply the circuit with your sound devices. Circuit Functional I use the -85 volt when the output current is supplied to the drive 350 to 340 very hot. Increase the output current, but it was too cold. The output to heat up faster than a normal open it. Sounds obvious, but sound quality is quite good. I recomment it by turning out for the evening. If the drive is mounted on the metal part out. I think simple. View full above, the observation that R 30 ohm then the voltage across the 0.86 V show that the new through its 29 mA if you add a file to / – 85 V, and suppose that the voltage across the component body. It was the same in both the R 30 ohm to get a very light 5 0.86 = 5.86 V and the current I will be 5.86/30 = 0.195 A = 195 mA, and the specification of mje340. mje3...

Car 12V to 50V DC Converter Circuit Diagram

Image
Car 12V to 50V DC Converter Circuit Diagram This circuit for Car audio input battery 12V to 50VDC, It use transistor and IC TL072.

2 1 Surround Speaker System Circuit Diagram

Image
 "Simple 2.1 Surround Speaker System " . Here I have used  three TDA 2030 IC for making signal amplification . Here you need a sub filter extra ( Sub filter circuit diagram link showing below ) . This project  mostly used in computer  . Part list and applications are showing below. Part List Component No: Value Usage All C1 100MF  Grounding  All C2 100nF Grounding All C3 100nF Grounding All C4 100MF Grounding All C5 100MF Feedback All C6 100MF Audio Coupling  All C7 220nF Noise Grounding  All R1 1K All R2 10K ( Not 1K ) All R3 22K All R4 22K (Not 1K ) All RV1 100K Volume Controlling  All D1 To D2 IN4007 Potential Breaking U1 To U6 TDA2030 Amplification Applications * 2.1 Surround Amplifier * 2.1 Home Theater

Automatic 9 volt Battery Charger Circuit Diagram

Image
Good care given to your NiCad batteries will ensure a long life. However, they do need to be handled and charged with special care. It is therefore important to first discharge the NiCad to 1 Volt per cell, ensure that the battery is discharged, and then start the charge cycle. recommend a charge current of 1/10th the capacity for a duration of about 15 hours uninterrupted. In reality, we learn some hard lessons when we forget to switch the charger off after the 15 hours and find that one or more cells inside the battery no longer accept a charge. That is the very reason that the circuit above is fully automated. The only thing to do is connect the battery and press the 'Start' button. When the discharge cycle is finished the circuit switches over to charge for 15 hours. After the 15 hours the circuits maintains a trickle charge to keep the battery 'topped-up Automatic 9-volt Battery Charger Circuit Diagram Before I go into the schematic details I like to explain some of th...

Little Door Guard Circuit Diagram

Image
If some intruder tries to open the door of your house, this circuit sounds an alarm to alert you against the attempted intrusion. The circuit (Fig. 1) uses readily available, low-cost components. For compactness, an alkaline 12V battery is used for powering the unit. Input DC supply is further regulated to a steady DC voltage of 5V by 3-pin regulator IC 7805 (IC2). Fig. 1: Circuit of the door guard Assemble the unit on a general-purpose PCB as shown in Fig. 4 and mount the same on the door as shown in Fig. 3. Now mount a piece of mirror on the door frame such that it is exactly aligned with the unit. Pin configurations of IC UM3561 and transistors 2N5777 and BC547 are shown in Fig. 2.  Fig. 2: Pin configurations of UM3561 and transistors 2N5777 and BC547 Initially, when the door is closed, the infrared (IR) beam transmitted by IR LED1 is reflected (by the mirror) back to phototransistor 2N5777 (T1). The IR beam falling on phototransistor T1 reverse biases npn transistor T2 and IC...

Microphone Circuit Test Oscillator Diagram

Image
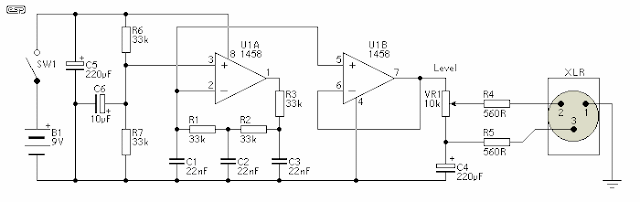
Description This unit would be mounted in a small plastic or preferably metal box, with a 9V battery, level control, a male XLR connector (same as on a mic) and a switch.  Current drain is low, since the circuit only uses one dual opamp.  There is no need for a high quality device, and a 1458 is all that is needed. Circuit Diagram The first stage is the oscillator itself.  This is a simple three stage phase shift oscillator - a circuit that is remarkably uncommon - which is to say I have never seen it used elsewhere.  I designed it for another project a few years ago, and I don't understand why it is not more common. If you want to tune it, you can use a 50k pot instead of R1.  I suggest that if tuned, set it to A-440 Hz.  Frequency stability is not wonderful, and it changes by a few Hertz as the battery discharges, but this is unlikely to cause problems - it is a test oscillator, not a tuning standard.  As shown, frequency will be about 430Hz, dependi...

Novel Buzzer Circuit Diagram

Image
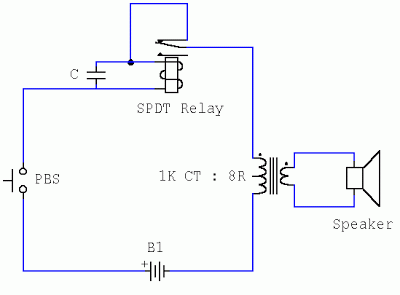
This Simple Novel Buzzer Circuit Diagram uses a relay in series with a small audio transformer and speaker. When the switch is pressed, the relay will operate via the transformer primary and closed relay contact. As soon as the relay operates the normally closed contact will open, removing power from the relay, the contacts close and the sequence repeats, all very quickly. S o fast that the pulse of current causes fluctuations in the transformer primary, and hence secondary. The speakers tone is thus proportional to relay operating frequency. The capacitor C can be used to "tune" the note. The nominal value is 0.001uF, increasing capacitance lowers the buzzers tone.

Simple 300w Subwoofer Power Amplifier Wiring Circuit Diagram

Image
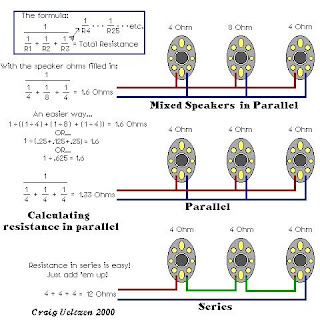
 Simple 300w Subwoofer Power Amplifier Wiring Circuit Diagram Subwoofer Speaker Wiring Diagram   Subwoofer Review. Subwoofer Wiring Diagrams  Four 4 Ohm Dual Voice Coil  Dvc  Speakers.  300w Subwoofer Power Amplifier Wiring Diagram Subwoofer Wiring Diagrams  Two 8 Ohm Single Voice Coil  Svc  Speakers. Discuss Ep4000   Maelstrom X Ii In The Diy Subwoofers Forum. Subwoofer Wiring Diagrams   Hip Hop Universe.Bazooka Subwoofer Wiring Diagram.  Need Sum Help Wiring Dual Coil Sub And Box Build Trinituner Com. Car Subwoofer Wiring  Sub 2 Output Is An Excellent Way To Connect Your Subwoofers The Total.