Posts

Showing posts with the label Light

Warning Light and Marker Light Circuit Diagram
Image
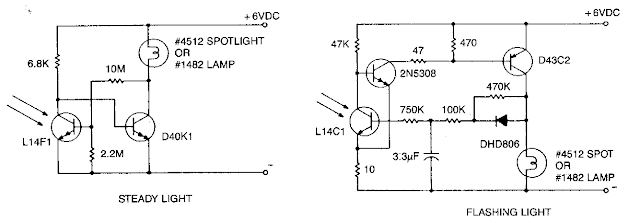
This is a Warning Light and Marker Light Circuit Diagram. A flashing light of high brightness and short duty cycle is often desired to provide maximum visibility and battery life. This necessitates using an output transistor, which can supply the cold filament surge current of the lamp while maintaining a low saturation voltage. The oscillation period and flash duration are determined in the feedback loop, while the use of a photo transistor sensor minimizes sensitivity variations.  Warning Light and Marker Light Circuit Diagram  

Automatic Low Power Emergancy Light Circuit diagram

Image
Here is a white-LED-based emergency light that offers the following advantages. 1-It is highly bright due to the use of white LEDs. 2-The light turns on automatically when mains supply fails, and turns off when mains power resumes. 3-It has its own battery charger. When the battery is fully charged, charging stops automatically. The charger power supply section is built around 3-terminal adjustable regulator IC LM317 (IC1), while the LED driver section is built around transistor BD140 (Q2). In the charger power supply section, an input AC main is stepped down by T1 to deliver 9V, 500mA to the bridge rectifier, which comprises diodes D1 through D4. Filter capacitor C1 eliminates ripples. Unregulated DC voltage is fed to input pin 3 of IC1 and provides charging current through D5 and limiting resistor R15. By adjusting preset P1, the output voltage can be adjusted to deliver the required charging current. When the battery gets charged to 6.8V, D6 conducts and charging current from IC1 fi...

Warning Light and Marker Light Circuit Diagram

Image
This is a Warning Light and Marker Light Circuit Diagram. A flashing light of high brightness and short duty cycle is often desired to provide maximum visibility and battery life. This necessitates using an output transistor, which can supply the cold filament surge current of the lamp while maintaining a low saturation voltage. The oscillation period and flash duration are determined in the feedback loop, while the use of a photo transistor sensor minimizes sensitivity variations.  Warning Light and Marker Light Circuit Diagram  

Simple Emergency Light

Image
This is an automatic emergency lamp with day light sensing, means it senses darkness/night and turns ON automatically. Similarly it senses day light and turns OFF automatically. A simple emergency lamp which does not require any special equipment; even a multimeter to assemble and use. Any individual who can do a good quality soldering must be able to build this circuit successfully. This can be easily accommodated in the defunct two 6 watt tube National Emergency Lamp or any PL tube type emergency lamp. The difference will be in the working; it will work non stop for more than 8 hours. Deep discharge is taken care by the LED characteristic and over charge protection is taken care by the fixed voltage regulator.This uses a simple 3Pin fixed regulator which has a built in current limiting circuit. Simple Emergency Light Circuit Diagram: The only required adjustment is the preset which has to be set to ensure the LEDs just light up (it should be left at that position). The 5mm LDR is jus...

Light Alarm Circuit Diagram

Image
LIGHT ALARM - 1 This circuit operates when lightweight|the sunshine} Dependent Resistor receives light. When no lightweight falls on the LDR, its resistance is high and also the transistor driving the speaker isn't turned on. When lightweight falls on the LDR its resistance decreases and also the collector of the second transistor falls. This turns off the primary transistor slightly via the second 100n and also the initial 100n puts a further spike into the bottom of the second transistor. This continues till the second transistor is turned on as onerous because it will go. the primary 100n is currently nearly charged and it cannot keep the second transistor turned on. The second transistor starts to turn off and each transistors swap conditions to provide the second half of the cycle. LIGHT ALARM - 2 This circuit is comparable to lightweight Alarm -1 however produces a louder output as a result of the speaker being connected directly to the circuit. The circuit is essentially a h...

Light Activated Relay

Image
This is same circuit as above with the addition of a photo resistor to trigger the flip flop instead of a push button. The bias resistor in series with photo resistor was chosen so that sufficient voltage is present at the base of the 2N3904 to supply current to the circuit in ambient lighting conditions. The circuit should toggle when the photo resistor is hit by a flashlight beam or other fast changing light source. Slow changes in light intensity will have no effect unless the light gets too bright to maintain sufficient bias for the 2N3904. Light Activated Relay Circuit diagram :

Solar Emergency Light Circuit Diagram

Image
The below circuit is an LED light solar emergency very simple to make the project cheaper, it was created for a working voltage of 6V and has a LED power 3watts In the circuit, you can see a solar panel 12 volts per 5watt, the LM7806 is used to charge the battery of 6 volts. The system is automatic, at dusk the lights turn on automatically with a help of an LDR and transistor. Solar Emergency Light Circuit Diagram

Light Gate with Counter

Image
The circuit described here counts the number of times that an infrared beam is interrupted. It could be used to count the number of people entering a room, for instance, or how often a ball or another object passes through an opening (handy for playing shuffleboard). The heart of the circuit consists of you guessed it a light gate! Diode D1 is an IR diode that normally illuminates IR transistor T1. The light falling on T1 causes it to conduct to a certain extent. The resulting voltage on the collector of T1 should be just low enough to prevent the following transistor (T2) from conducting. This voltage can be adjusted within certain limits using P1.  Circuit diagram : Light Gate with Counter Circuit Diagram As soon as an object comes between D1 and T1, the light shining on T1 will be partially or fully blocked, causing the IR transistor to conduct less current. As a result, the voltage on its collector will increase, producing a brief rise in the voltage on the base of T2. This wi...

Traffic Light 20 Chanel based on 74LSxx

Image
Traffic Light 20 Chanel based on 74LSxx This view of the proposed traffic Light 20 Chane based only on family and 74LSxx IC 555 as clock source. It is a digital logic circuit. To construct the traffic light rangkaian Control requires no programming of microcontrollers. This page features a circuit that has twenty open collector outputs that turn on one at a time in a continuous sequence. The circuit make use of the family 74LSxx TTL integrated logic devices. The circuits are designed to drive light emitting diodes or low current and low voltage incandescent lamps, but can also lead to other charges of 80 milliamps. notes: The low output go in sequence from 1 - 0 and back to 1 -0 At the clock rate of the 555 timer c3 = 1uf to 10uf depending on the rate of change desured R2 (Variable resistor) in use to determine the timer

Midnight Security Light Circuit Schematic

Image
Most thefts happen after midnight hours when people enter the second phase of sleep called ‘paradoxical’ sleep. Here is an energy-saving circuit that causes the thieves to abort the theft attempt by lighting up the possible sites of intrusion (such as kitchen or backyard of your house) at around 1:00 am. It automatically resets in the morning. The circuit is fully automatic and uses a CMOS IC CD 4060 to get the desired time delay. Light-dependent resistor LDR1 controls reset pin 12 of IC1 for its automatic action. During day time, the low resistance of LDR1 makes pin 12 of IC1 ‘high,’ so it doesn’t oscillate. After sunset, the high resistance of LDR1 makes pin 12 of IC1 ‘low’ and it starts oscillating, which is indicated by the fashing of LED2 connected to pin 7 of IC1. The values of oscillator components (resistors R1 and R2 and capacitor C4) are chosen such that output pin 3 of IC1 goes ‘high’ after seven hours, i.e., around 1 am. This high output drives triac 1 (BT136) through D5 an...

Remote Solar LED light Circuit Diagram

Image
Introduction I created this circuit in an attempt to make the simplest possible solar powered project. It would make for an excellent science fair project, and would also serve as a good introduction to solar powered circuitry. It may also have some practical uses, such as shedding some light into a dark part of your house. The idea is simple, the solar panel converts sunlight into a trickle of electricity. The electricity is used to run a white LED. Specifications Operating Voltage: 3.7V DC Solar Current: 25ma max. LED Lamp Operating Current: 10-25ma. Theory The remote solar powered LED light takes advantage of the current limited nature of solar photovoltaic cells. If light shines on the solar array, current will flow through the circuit. For a typical size of solar cell, there is a maximum current that can be produced. The maximum solar cell current is simply matched to a value of current that the LED can handle. If there is enough light to raise the solar panel's voltage ab...

Laser Beam Light Activated Remote Control Circuit

Image
The following post illustrates a simple light toggled/operated remote control circuit, which can be activated by an ordinary flashlight or more effectively through a laser beam unit (key chain type). The circuit idea may be understood with the below mentioned points: Transistor T1 alnog with R3, C6 and the LDR itself forms a simple light sensor stage.  The LDR is connected across the base of the transistor and the positive supply such that when light falls over the LDR, T1 receives the required base bias and conducts.  When T1 conducts, the high potential at pin 14 of IC1 is pulled to logic low. However since a logic low wouldn't effect pin#14, IC1 does not respond as yet. The moment light on the LDR is switched OFF, T1 is switched OFF and pin#14 now instantly receives a subsequent logic high via R5.....now IC1 responds, and shifts it's output from pin#3 to pin#2. This makes pin#3 logic low, activating T2, and the preceding relay driver stage. The above condition pers...

Simple Day Light Sensor Circuit using LDR and UM66 IC

This article helps you to make a Light Sensitive Morning Alarm circuit. The morning light is sensed by an LDR (Light Dependent Resistor) or Photoresistor and it triggers the alarming section. The circuit generates a melodious tone when light falls on it. Wire-up the circuit as shown in schematic diagram and place the LDR next to the window pane closer to your bed. The LDR is more sensitive to light, so make sure it will not be false triggered. All the electronic components used in this circuit is cheap, so you can make this at your own home at very low cost and it consumes very less power, hence it ensures long working life. Read More.....

LED Light Pen Circuit Diagram

Image
Physicians and repair engineers often use small light pens for visual examination purposes. Rugged and expensive as these pens may be, their weak point is the bulb, which is a ‘serviceable’ part. In practice, that nearly always equates to ‘expensive’ and / or ‘impossible to find’ when you need one. LEDs have a much longer life than bulbs and the latest ultra bright white ones also offer higher energy-to-light conversion efficiency. On the down side, LEDs require a small electronic helper circuit called ‘constant-current source’ to get the most out of them.   LED Light Pen Circuit Diagram Here, T1 and R1 switch on the LED. R2 acts as a current sensor with T2 shunting off (most of) T1’s base bias current when the voltage developed across R2 exceeds about 0.65 V. The constant current through the white LED is calculated from R2 = 0.65 / ILED With some skill the complete circuit can be built such that its size is equal to an AA battery. The four button cells take the place of the other...

Light sensor component

Electronic components are included in the category of light sensors are as follows: - LDR - Photo Transistor - Photo Diode - Infrared Receiver The function of the electronic component is to detect the intensity of light received by the component. The light sensor is often used in electronic equipment such as on television, light a light switch, light intensity measuring instrument.

Automotive LED Timing Light

Image
A useful timing strobe can be constructed using high-brightness LEDs and a few common components. Ignition pulses from the number 1 cylinder high-tension lead are used to trigger the circuit via a home-made inductive pickup. Transistors Q1 & Q2 buffer and amplify the pulses from the pickup, which then drive the inputs of three Schmitt-trigger inverters (IC1a, IC1c & IC1f). Each positive pulse at the inverter inputs causes a low pulse at their outputs, forward-biasing D2 and immediately discharging the 6.8nF capacitor. When the capacitor is discharged, the inputs of the second bank of three inverters (IC1b, IC1d & IC1e) see a logic low level, so their outputs go high, driving Q3 into conduction and powering the LED array. After the pulse ends, the IC1a, IC1c & IC1f inverter outputs return high, reverse biasing D2. Circuit diagram: Automotive LED Timing Light Circuit Diagram However, it takes some time for the 6.8nF capacitor to charge to the logic high threshold voltage ...

Automatic Night Light using Phototransistor

Image
Here is the simple Automatic Night Light circuit using Phototransistor. Components Required: 1) Breadboard 2) 470 ohm resistor 3) 22 Kilo ohm resistor 4) LED (Any Color) 5) Phototransistor 6) 3904 NPN Transistor 6) 9Volt Battery  Procedure: Connect the circuit as shown in the circuit diagram below. During day time the brightness will be more, which forward biases the phototransistor. Therefore the current flows through the collector to emitter of phototransistor. Hence there is no base current to forward bias the 3904 NPN transistor and the LED remains OFF. During night time the brightness goes down, which cannot forward bias the phototransistor. Therefore the current will not flow through the phototransistor. Hence there is enough base current to forward bias the 3904 NPN Transistor and the LED glows. Circuit Diagram: Figure 1: Automatic Night Light using Phototransistor Circuit simulation made in Multisim Figure 2: Automatic Night Light using Phototransistor

LED driven tail brake Light Cluster

Image
Constant current circuitry 12V Battery operation This circuit was designed on request to drive a Light-cluster formed by several LEDs that can be mounted in the vehicle as a tail and brake light. When SW1 is on, the cluster will illuminate at medium brightness. When brakes are operated, SW2 will be closed and the cluster will shine at maximum brightness. These two brightness levels of the cluster are obtained by a constant current source drive formed by Q1 and Q2. The two constant current levels are set by R2 and R3 values. Circuit diagram : LED driven tail/brake Light Cluster Circuit Diagram   Parts : R1___10K  1/4W Resistor R2___33R  1/4W Resistor (See Notes) R3___15R  1/4W Resistor (See Notes) D1___1N5819   40V 1A Schottky-barrier Diode (See Notes) D2--D13___LEDs   High brightness, high efficiency red types (See Notes) Q1___BC547   45V 100mA NPN Transistor Q2___BC337   45V 800mA NPN Transistor SW1___SPST   Tail Light Switch SW2___SPST   Brake Light Switch Notes: The...

Make a Warning Light and Marker Light Circuit Diagram

Image
Make a Warning-light-and-marker-light. This is a led flasher light, A flashing light of high brightness and short duty cycle is often desired to provide maximum visibility and battery life. This necessitates using an output transistor, which can supply the cold filament surge current of the lamp while maintaining a low saturation voltage. The oscillation period and flash duration are determined in the feedback loop, while the use of a photo transistor sensor minimizes sensitivity variations. Warning Light and Marker Light Circuit Diagram

LDR Light Switch Circuit Diagram

Image
This is a light switch or light activated relay circuit .The relay on when LDR uncoverd and relay off when LDR covered .Adjust VR1 for light sensitive.LED will turn on at the same time with relay